
Install solar garden string lights by choosing a sunny spot for the panel, securing the lights, and checking that they turn on after dark. This guide is for beginners setting up lights in a garden, on a patio, or along a fence. Allow 45-90 minutes for installation, then give the panel a full sunny day to charge before judging the nighttime brightness.

Get garden gear delivered free with Prime
- Fast, free delivery on millions of items
- Prime Video, Amazon Music and more included
- Member-only deals all year
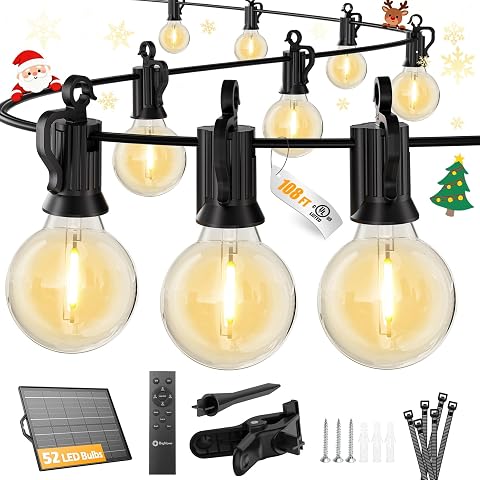
Brightown 108FT 52LED Solar String Lights Outdoor with Remote & USB Port
- ✔ String length: 108 ft
- ✔ Bulbs: 50 plus 2 spare G40 LED bulbs
- ✔ Bulb spacing: 2 ft
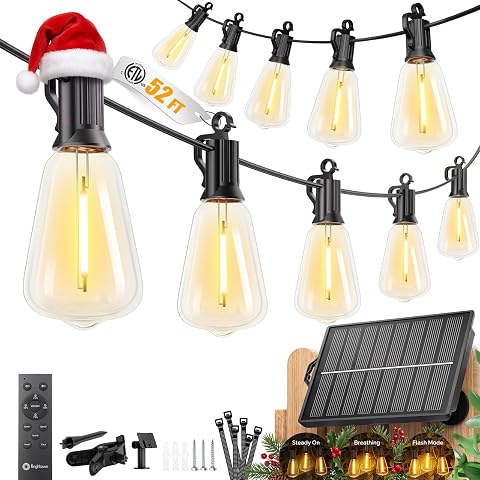
Brightown 52FT Solar String Lights Outdoor Waterproof, Last 30+ Hrs Runtime
- ✔ String length: 52 ft, including 9 ft lead and 1 ft tail
- ✔ Bulbs: 15 plus 1 spare ST38 LED bulbs
- ✔ Bulb spacing: 3 ft

addlon 52FT(48+4) Solar String Lights Outdoor, Waterproof Dimmable 16+1 LED
- ✔ String length: 52 ft (48 ft string plus 4 ft)
- ✔ Bulbs: 16 sockets, 17 bulbs including 1 spare
- ✔ Bulb spacing: 3 ft
Difficulty: Beginner | Time: 45-90 minutes, plus a full sunny day for the first charge
What You’ll Need
Tools & Materials:
- Solar string light set with its solar panel, stake or mounting bracket, and instructions
- Tape measure
- Outdoor-rated hooks, clips, or ties suited to the mounting surface
- Screwdriver or drill if the chosen mounts require one
- Ladder for elevated mounting, if needed
Knowledge:
- Basic measuring and ability to secure a hook or clip
- How to identify a location that receives direct sunlight
- Safe ladder use if mounting lights above ground level
Check the product instructions for the set’s charging method, weather rating, and mounting limits. Some panels have a switch or removable shipping tab; others need several hours of direct sun before they can run through a full evening. Use outdoor-rated hardware, and do not install lights near overhead power lines.
Brightown 108FT 52LED Solar String Lights Outdoor with Remote & USB Port
When a short string would leave a pergola, fence, or seating area only partly lit, Brightown’s 108-foot run gives us the most coverage in this lineup. Its bulbs are spaced two feet apart, so the light points are closer together than on either 52-foot option, which uses three-foot spacing. That can create a more continuous pattern across a long area, while the additional cable ties and included panel mounting clip offer practical help during installation.The set also pairs remote dimming, three light modes, and 6- or 8-hour timers with solar and USB-C charging. USB backup is useful for cloudy stretches or when we want to prepare the lights before an occasion. The manufacturer claims 36-plus hours of illumination, though real results will depend on charging and settings. Compared with the 52-foot Brightown, this set takes on a much larger layout; compared with addlon, it has closer spacing and a longer stated runtime, but fewer timer choices.There is a planning constraint: the string cannot be connected to another set. Buyers who need a continuous run longer than 108 feet will need a different layout or another solution. The long length may also be more than a small balcony needs, and the panel still needs a sunny position for reliable solar charging. We’d choose it for a large garden where coverage is the priority and the separate string length fits the plan.
Pros:
- 108-foot length covers more area than either 52-foot alternative.
- Two-foot bulb spacing creates a denser layout than the other listed sets.
- Remote offers four brightness levels, three modes, and 6- or 8-hour timers.
- Solar and USB-C charging provide a backup when sunlight is limited.
Cons:
- The string cannot be connected to another set.
- A large run may be cumbersome for a small garden or balcony.
- The claimed runtime depends on charging conditions and selected brightness.
Best for: Garden owners who want one long, closely spaced run across a large patio, pergola, or fence.
Not ideal for: Anyone planning to connect multiple strings, or lighting only a compact balcony or small seating nook.
Bottom line: For a large garden that needs a single long run, Brightown’s 108-foot set offers the strongest mix of coverage and control, provided its fixed length suits the layout.
“For a large garden that needs a single long run, Brightown’s 108-foot set offers the strongest mix of coverage and control, provided its fixed length suits the layout.”
Brightown 52FT Solar String Lights Outdoor Waterproof, Last 30+ Hrs Runtime
For a smaller patio or garden corner, Brightown’s 52-foot set avoids the excess line of the 108-foot model while keeping the same broad control approach: remote dimming, three lighting modes, and timed shutoff. Its 15 bulbs plus one spare are spaced three feet apart, giving the string a more open look than the denser 108-foot option. That can suit a fence or pergola where we want distinct pools of warm light rather than more frequent bulbs.The standout claim is 30-plus hours of illumination on a full charge, along with a USB recharge time of about four hours. That is longer than addlon’s stated 20-plus hours, although runtime claims should not be treated as guarantees under every brightness or weather condition. Like the longer Brightown set, this one has a 180-degree adjustable panel and automatic dusk-to-dawn operation. Each bulb also has a hook, which may make it easier to adapt the line to different anchor points.The shorter length and wider spacing mean it will not cover a large garden as evenly as Brightown’s 108-foot option. It also has only 6- and 8-hour timer settings, whereas addlon offers more increments for shorter evenings. We’d pick this model when a defined 52-foot run and a longer stated runtime matter more than close bulb spacing or detailed scheduling. Buyers should still plan the panel location carefully: USB backup helps, but it does not remove the need to recharge.
Pros:
- 30-plus-hour claimed runtime is the longest stated among these 52-foot options.
- Solar and USB charging provide two ways to replenish the battery.
- Each bulb has a hook for flexible placement.
- Remote includes four brightness levels and three modes.
Cons:
- Three-foot spacing gives a less dense pattern than the 108-foot Brightown.
- Only 6- and 8-hour timer choices are listed.
- The 52-foot length may not span a larger garden layout.
Best for: Buyers lighting a modest patio or garden run who value a longer stated runtime and remote controls.
Not ideal for: Large spaces needing dense bulb coverage, or people who want several timer durations.
Bottom line: This is the compact pick for buyers who want Brightown’s remote features in a shorter string and prioritize its 30-plus-hour runtime claim.
“This is the compact pick for buyers who want Brightown’s remote features in a shorter string and prioritize its 30-plus-hour runtime claim.”
addlon 52FT(48+4) Solar String Lights Outdoor, Waterproof Dimmable 16+1 LED
Addlon’s 52-foot string is the scheduling specialist in this group. Its remote provides three brightness settings and timers for 2, 4, 6, or 8 hours, giving us more ways to match the lights to a short meal outdoors or a longer evening. Brightown’s two sets offer four brightness levels, but their timer choices begin at six hours; for someone who wants the lights off earlier, addlon’s shorter settings are the differentiator.The set includes 16 sockets and 17 shatterproof Edison-style bulbs, with one spare, across a 48-foot string plus a four-foot lead. Its bulb spacing is listed as three feet, similar to the 52-foot Brightown, so neither short set creates the closer pattern of the 108-foot model. Addlon also supports solar and USB charging, and the manufacturer says a full USB charge takes about four hours. Its stated runtime is 20-plus hours, shorter than the 30-plus-hour claim for Brightown’s 52-foot set.That shorter claimed runtime is the key tradeoff if the lights need to stay on deep into the night. The supplied description also recommends charging by USB when first received and using USB after extended cloudy or rainy weather, which makes backup charging a practical part of ownership. We’d choose addlon when its range of timer intervals matters more than maximizing stated runtime. For buyers who primarily want long coverage, Brightown’s 108-foot string is a better match; for a compact line with a longer runtime claim, the 52-foot Brightown has the edge.
Pros:
- Four timer durations include shorter 2- and 4-hour settings.
- Three brightness settings and three lighting modes are included.
- Solar and USB charging help when sunlight is insufficient.
- Includes 16 sockets and one spare shatterproof bulb.
Cons:
- Its 20-plus-hour runtime claim is lower than Brightown’s 52-foot model.
- Three-foot bulb spacing is less dense than the 108-foot Brightown.
- The supplied guidance recommends USB charging after prolonged cloudy weather.
Best for: People who want a 52-foot garden string with short timer intervals for planned evenings outdoors.
Not ideal for: Buyers prioritizing the longest stated runtime or a densely spaced, long-distance layout.
Bottom line: Choose addlon when flexible timer scheduling is the deciding factor, and accept a shorter stated runtime than Brightown’s 52-foot alternative.
“Choose addlon when flexible timer scheduling is the deciding factor, and accept a shorter stated runtime than Brightown’s 52-foot alternative.”
As an Amazon Associate we earn from qualifying purchases.
Before You Start
Unpack the set and check that the bulbs, cable, panel, stake or bracket, and connectors are present and undamaged. Read the charging and operating instructions before mounting anything. Keep the panel’s cable within reach of the lights without stretching it tight, and plan a route that does not cross a walkway or create a trip hazard. If the set is damaged, has exposed wiring, or is not rated for outdoor use, do not install it outdoors.
Step-by-Step Instructions
Step 1: Choose a sunny panel location
Find a spot that receives several hours of direct sunlight during the day, ideally without shade from buildings, fences, trees, or umbrellas. Check the spot at different times if you are unsure; a location that is sunny in the morning may be shaded by afternoon. Place the panel where you can reach its switch and clean its surface.
Tip: The panel can sit some distance from the lights if the connecting cable reaches without tension. Favor sunlight for the panel over a convenient but shady mounting point.
Check: The panel has a clear view of the sky for much of the day, and the cable can reach the planned light route.
Step 2: Measure and plan the light route
Measure the path where the lights will hang, then compare it with the usable cable length between the first and last bulbs. Mark the intended support points and decide where the panel cable will run. Leave a little slack between supports so wind does not pull the cable taut, while keeping it high enough to stay clear of people and pets.
Tip: Do not count the panel lead as part of the string length unless the manufacturer lists it that way. Avoid placing the cable where a gate, mower, or chair can snag it.
Check: The string reaches the planned route with enough slack, and the cable avoids paths and moving objects.
Step 3: Test the set before mounting
Set the switch to the position specified in the instructions, remove any battery isolator tab, and connect the panel if the set requires it. Charge the unit as directed. To check operation, cover the panel or use its test mode if provided; many sets only turn on when the panel senses darkness. Do not assume the lights are faulty if they stay off in daylight.
Tip: Some models require an initial full charge before they reach normal brightness. Follow the supplied charging time rather than relying on a quick test.
Check: The set responds to its test mode or turns on when the panel is shaded after charging.
Step 4: Secure the solar panel
Install the panel stake in firm soil or attach its bracket to a stable surface, following the product instructions. Aim the panel toward the open sky and adjust its angle if the mount allows it. Press the stake in securely without forcing or striking the panel. If mounting on a wall or fence, use suitable outdoor fasteners and keep the panel connector protected as directed.
Tip: Do not bury, cover, or permanently obstruct the panel. Leave enough access to switch off the set and wipe dust or pollen from its surface.
Check: The panel stays upright or firmly attached, faces an unshaded area, and its cable connection is not strained.
Step 5: Install the hanging supports
Attach outdoor-rated hooks or clips at the points you marked. For a fence or pergola, fasten clips to sound structural material rather than loose trim. If using a ladder, place it on level ground and have another adult steady it. Keep fasteners clear of wiring, and do not use nails or staples that could pierce the light cable.
Tip: Use supports appropriate to the surface and the weight of the string. Avoid tying cable tightly around branches, which can damage the cable as the branch moves or grows.
Check: Each support feels secure, and the route leaves room to hang the string without stretching it.
Step 6: Hang the lights and route the lead
Starting near the panel or power lead, hang the string on the supports and work along the planned route. Keep the cable supported at intervals, with gentle curves between attachment points. Route the lead along a wall, fence, or edge where it cannot be stepped on, pinched, or caught by garden tools. Connect the panel only as instructed, and keep connectors out of standing water.
Tip: Handle bulbs by their bases where possible. Do not pull on the bulbs or connector to move the string, and do not force plugs together if their alignment is wrong.
Check: The string hangs evenly, the cable is not taut or damaged, and no section blocks a doorway or walkway.
Step 7: Set the controls and check after dark
Turn the set on and select its desired mode, such as steady or flashing, if available. Let the panel charge through the day, then check the lights after dusk. If they do not come on, consult the troubleshooting section and the product instructions before changing the installation. Adjust bulb spacing or support points only after switching the set off if the manufacturer recommends it.
Tip: Automatic dusk sensors may need the panel exposed to darkness; nearby porch or landscape lighting can sometimes keep them from switching on.
Check: The lights turn on after dusk, stay connected, and illuminate the intended area without sagging or flickering.
Common Mistakes to Avoid
- Putting the panel in a shaded spot while focusing on the most visible place for the lights. — Choose the panel location based on daytime sun exposure first, then route the string to the display area within the cable’s reach.
- Stretching the string tight between supports. — Leave gentle slack and add supports along longer runs so wind and cable weight do not pull on connectors.
- Using indoor hooks or metal fasteners that cut into the cable. — Choose outdoor-rated clips sized for the cable, and never pierce or staple through the wire.
- Deciding the lights are broken after a brief daytime test. — Follow the initial charging instructions and test the dusk sensor by shading the panel or using the model’s test function.
Troubleshooting
Problem: The lights do not turn on after dark.
Solution: Check that the switch is on, the panel connector is fully seated, and any shipping tab has been removed. Charge the panel in direct sun for the period stated in the instructions. Move it away from artificial light that may confuse the dusk sensor, then retest after dark.
Problem: The lights turn on but are dim or switch off early.
Solution: Clean the panel and check for new shade from foliage or nearby objects. Give it a full sunny day to charge. Cold weather, short winter days, and cloudy weather can reduce run time; consult the product specifications for expected seasonal performance.
Problem: Only part of the string lights.
Solution: Switch the set off and inspect the cable and bulb connections for looseness or damage. Reseat any user-serviceable bulb or connector as the manual directs. If the cable is cut or exposed, stop using the set and contact the manufacturer.
Problem: The string sags, pulls loose, or shifts in wind.
Solution: Switch the set off, add supports along the run, and rehang it with gentle slack. Replace weak or unsuitable mounts with outdoor-rated hardware attached to a stable surface.
What Success Looks Like
The panel is firmly mounted in a sunny location, the cable and bulbs are supported without strain, and the route stays clear of walkways and moving equipment. After a full sunny charge, the lights come on at dusk and illuminate the area as expected. Connectors remain secure, and no wire is pinched, pierced, or exposed.
Next Steps
Check the mounts and cable after strong wind or heavy rain, and wipe dust or pollen from the panel when it reduces sunlight. Before storing a removable set for winter, follow its instructions for disconnecting and protecting the panel and battery. Replace damaged components with parts approved for that model, and stop using the set if wiring becomes exposed or the panel housing cracks.
Frequently Asked Questions
How much sun do solar garden string lights need?
Follow the manufacturer’s charging guidance. Many sets work best after several hours of direct sunlight, while cloudy weather and shade reduce charging. Place the panel in the sunniest practical spot and allow a full sunny day before evaluating run time.
Can I put the solar panel away from the lights?
Usually, if the panel’s lead reaches the display area without stretching or creating a trip hazard. Check the cable length and the product instructions before choosing the mounting points.
Why do the lights turn on during the day when I test them?
Some sets have a test mode or turn on when their panel is covered. Normal automatic operation may be controlled by a dusk sensor, so check the instructions and test the set after dark as well.
Can solar string lights stay outside in rain?
Only if the product is rated for outdoor use and installed as directed. Check the rating for the bulbs, panel, and connectors; keep connectors out of standing water and bring in components that the manual says are not weatherproof.
What should I do if the lights stop working?
Check the switch, charge level, panel position, and connections first. If a wire is exposed, a connector is cracked, or the set still fails after following the manual’s checks, stop using it and contact the manufacturer for compatible repair or replacement parts.