This Jack-O-Lantern will instantly elevate your Halloween decor, adding a spooky touch that's sure to impress. Start by setting up a clean workspace and gather your carving supplies. Choose a unique design and mark it on your pumpkin before you carve. Experiment with scarring techniques for an eerie effect and don't forget to use candles or LED lights for illumination. Consider painting your pumpkin for extra flair! With the right techniques, you'll create a haunting masterpiece that captures everyone's attention. Curious about more tips and tricks to perfect your Jack-O-Lantern game? There's plenty more to explore!
Key Takeaways
- Create a monstrous Jack-O-Lantern using scarring techniques for a terrifying appearance that enhances your Halloween decor.
- Combine parts from multiple pumpkins to craft a unique Frankenstein's monster for an eye-catching centerpiece.
- Utilize stencils and templates to achieve intricate designs that add depth and detail to your spooky decorations.
- Incorporate props like dried pasta and okra to elevate your Jack-O-Lantern and create a multidimensional effect.
- Arrange your Jack-O-Lanterns in clusters with other Halloween decor for a stronger visual impact and festive ambiance.

Runleo Halloween Decorations Pumpkin String Lights – 20 LED 10 FT 3D Cute Waterproof Orange Jack-O-Lantern Battery Operated Lights, 2 Modes Steady/Flickering Light for Indoor Outdoor Party Decor
20 LED Cute Pumpkin String Lights: The set of 20 LED 3D orange Jack-O-Lantern lights brightens up your…
As an affiliate, we earn on qualifying purchases.
As an affiliate, we earn on qualifying purchases.
How to Carve a Jack-O-Lantern
To carve a Jack-O-Lantern, first set up a clean workspace by laying down newspaper or paper bags to catch any mess from the carving process. Gather your essential supplies: a serrated knife, a spoon for scooping, a marker for your design, and a candle (an LED one is safest).
Start by drawing your design directly on the pumpkin. If you want to highlight specific facial features, take your time to sketch them out clearly. Remember to mark a circular lid on top and cut it at a 45-degree angle to prevent it from falling inside.
Once you've cut the lid, scoop out the seeds and pulp thoroughly to guarantee a clean interior, which helps keep your pumpkin fresh longer. If you're aiming for intricate designs or detailed facial features, consider using templates or practicing on a separate pumpkin first.
This way, you can refine your skills before you make a pumpkin that'll be the star of your Halloween decorations. With patience and attention to detail, you'll create a Jack-O-Lantern that adds a perfect spooky touch to your home this Halloween!

The Ultimate Pumpkin Carving Kit with 10 Pop-Out Stencils
(2) Carving Tools, (1) Marker, (1) Pumpkin Scooper
As an affiliate, we earn on qualifying purchases.
As an affiliate, we earn on qualifying purchases.
Spooky Jack-O-Lantern Designs

After you've mastered the art of carving, exploring spooky Jack-O-Lantern designs can take your Halloween decor to the next level. You can choose from classic faces or immerse yourself in unique concepts like Werewolf Teeth or Freddy Krueger Pumpkins, which add a chilling twist to your decorations.
Tall Jack-O-Lanterns and mouthy designs with exaggerated features create a strong visual impact, ensuring your carved pumpkins stand out in your yard or home.
If you prefer something simpler, opt for minimalistic scary faces that effectively use negative space. These designs are approachable for beginners and still deliver a frightful vibe.
Using templates and stencils can also make the carving process easier and more enjoyable, providing you with varied expressions while ensuring consistent results across multiple pumpkins.

CHRYZTAL Pumpkin Carving Kit Tools Halloween, Professional Heavy Duty Carving Set, Stainless Steel Double-side Sculpting Tool Carving Kit for Halloween Decoration Jack-O-Lanterns, Gift for Halloween
【10 Professional Pumpkin Carving Kit】 The package includes Pumpkin scooper X 1, Small saw X 2, Pumpkin drill…
As an affiliate, we earn on qualifying purchases.
As an affiliate, we earn on qualifying purchases.
Unique Pumpkin Carving Techniques

Unique pumpkin carving techniques open up a world of creativity, allowing you to transform ordinary pumpkins into extraordinary works of art.
To create a truly scary Halloween display, experiment with scarring techniques by using a sharp tool or knife to carve stitches into the pumpkin's surface. This adds a monstrous effect that'll have your neighbors talking.
For a unique twist, combine parts from multiple pumpkins to design your own Frankenstein's monster. Mixing different shades and textures gives your creation a deformed, eye-catching look. If you're working with foam pumpkins, try using cotton balls and Mod Podge to sculpt facial features, adding depth and character.
For an even more unconventional approach, melt foam pumpkins with a heat gun after cutting faces into them, allowing for creative experimentation with shapes.
Don't forget to incorporate props like dried pasta for teeth or okra for hair, which can add dimension and flair to your jack-o-lantern designs.
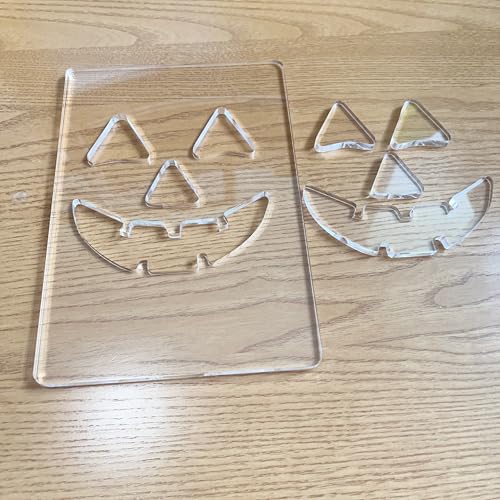
Acrylic Router Template for Jack O'Lantern Face Designs, 5.5×8 Inch, 8 Halloween Pumpkin Patterns, Woodworking Template (Classic)
VERSATILE DESIGNS: Choose from 8 unique Halloween patterns including Classic, Scary, Mean, Scream, Zipper mouth, Frankenstein, Witch hat,…
As an affiliate, we earn on qualifying purchases.
As an affiliate, we earn on qualifying purchases.
Maintaining Your Jack-O-Lantern

Maintaining your Jack-O-Lantern's freshness is key to ensuring it remains a standout decoration throughout the Halloween season. Start by placing your pumpkin in a cool, dry spot away from direct sunlight. This helps slow down decay, allowing your pumpkin to last longer. Regularly check for mold or rot. If you spot any, clean the surface with a diluted bleach solution to combat deterioration.
Here's a quick guide to help you maintain your Jack-O-Lantern:
| Step | Description |
|---|---|
| 1. Let it dry | After cleaning, allow it to dry completely. |
| 2. Use cold water | Rinse your pumpkin with cold water to remove dirt. |
| 3. Apply preservative | Use a pumpkin preservative spray to lock in moisture. |
Don't forget to leave the stem attached, as it retains moisture and nutrients. Also, cutting the access hole at the bottom or back makes gut removal easier and simplifies maintenance. By following these tips, you can enjoy your Jack-O-Lantern throughout the spooky season!
Creative Paper-Mâché Options

If you want to get creative with your Jack O'Lanterns, paper-mâché offers unique techniques that can transform simple materials into stunning decorations.
You can personalize your pumpkins with different shapes and intricate facial features, then enhance them further with your favorite painting and finishing touches.
Let's explore how to make your paper-mâché pumpkins stand out this Halloween!
Unique Paper-Mâché Techniques
Crumpled newspaper bags can be shaped and layered to create a stunning pumpkin-like structure that adds depth to your Halloween decor. By using unique paper-mâché techniques, you can build a mesmerizing centerpiece. Start by layering overlapping strips of newspaper, securing them with twine to create natural ridges, much like those on a real pumpkin.
For added character, you might want to incorporate cotton balls coated in Mod Podge. This will allow you to sculpt detailed facial features and textures that bring your pumpkin to life. Remember to focus on the bottom of the pumpkin, ensuring it's strong enough to support your design and any light source you plan to use inside.
If you're feeling adventurous, you can even experiment with melting foam pumpkins. Cut them into irregular shapes, peel off the vinyl layer, and apply heat for exciting textural effects.
With these techniques, you'll not only create a unique decoration but also enjoy the process of crafting something truly special for the season. Keep layering and shaping until you achieve the look you want, and don't forget to make it even for a polished finish!
Painting and Finishing Touches
Transform your paper-mâché pumpkin into a stunning centerpiece by carefully layering paint and finishes that enhance its spooky charm. Start by applying a dark base coat using black or brown spray paint. This foundational layer sets the stage for the vibrant colors to follow, giving your pumpkin an eerie depth.
Next, employ the dry brushing technique with various shades of orange to add texture and realism. For added dimension, create shadowing effects by applying a thin brown wash over the surface. This step makes all the difference in achieving a lifelike quality.
To elevate your spooky creation even further, consider these finishing touches:
- Highlight facial features with Naples yellow for a dramatic pop.
- Experiment with floor stain to create a textured, rotted effect.
- Layer additional colors for complexity and interest.
- Seal your masterpiece to protect it from the elements.
With these techniques, your paper-mâché pumpkin won't only stand out but also captivate anyone who crosses its path. Get ready to impress and frighten this Halloween!
Finding Inspiration for Carvings

Exploring unique pumpkin shapes, like those with lumps or scars, can spark your creativity and lead to truly original Jack-O-Lantern designs. These distinct features can inspire you to create creative carving designs that stand out. To gather ideas, utilize online resources, browse books like 'Extreme Pumpkins,' or participate in local workshops. You'll discover a treasure trove of techniques and concepts to enhance your carving skills.
Consider using templates and stencils to simplify the process. These tools often feature popular culture references, allowing you to achieve intricate carvings with less effort. If you're feeling adventurous, experiment with combining different carving techniques, such as scarring and layering. This approach adds depth and character to your Jack-O-Lantern, creating a multi-dimensional effect that captivates.
Don't forget to draw inspiration from popular culture, horror films, and classic Halloween motifs. Themed carvings can resonate strongly with the spirit of the season, making your Jack-O-Lantern a true centerpiece. So, grab that pumpkin, let your imagination run wild, and have fun bringing your spooky vision to life!
Conclusion
As dusk settles and shadows stretch, your meticulously carved jack-o-lantern awaits its moment.
With a flicker of candlelight, its eerie grin comes to life, casting ghostly shapes on your walls.
You take a step back, heart racing, as the chilling atmosphere deepens.
Will it be the talk of the neighborhood, or will it send shivers down spines?
One thing's for sure: this Halloween, your decor's about to take a thrilling turn, and the night's just begun.