Craft a boho paradise with a macramé wall hanging that channels Tulum’s relaxed essence. Form a serene ambiance with neutral ropes and driftwood for a true bohemian feel. Securely attach macramé pieces to wood using tight knots for stability. Add personal flair with beads or feathers for an artistic touch. Hang your masterpiece straight and sturdy using nails or hooks. Discover the secrets to perfect cord types and cost-saving tips for best outcomes. Reveal the magic of creating your own Tulum-inspired retreat through macramé artistry.
Key Takeaways
- Choose neutral ropes for a boho vibe.
- Incorporate driftwood for a natural touch.
- Add decorative elements like beads or feathers.
- Utilize macramé knotting techniques for authenticity.
- Ensure proper hanging alignment for a Tulum-inspired look.

FREEBLOSS 2 Set DIY Macrame Lotus Wall Hanging Kit Macrame Tapestry Wall Hanging with Macrame Frame Lotus Wall Hanging Decor for Living Room Macrame Kit for Beginner with Instruction
Complete Macrame Kit: You will get 2pcs lotus macrame frame, 100m/328ft white cotton cord, 30pcs wooden beads, comb,…
As an affiliate, we earn on qualifying purchases.
As an affiliate, we earn on qualifying purchases.
Required Materials for Macramé Wall Hanging
Gather driftwood, three different types of neutral ropes (Braided, Three-ply, Single twist, 5mm), and a hot glue gun for optional use for your macramé wall hanging project.
When selecting the ropes, make sure to choose the right shades to achieve the desired boho look. The tutorial emphasizes the importance of using the specific rope types mentioned to guarantee the best results. By following the supply list with the correct measurements provided in the video description, you can save costs and avoid wastage.
To start your project off on the right foot, organize your materials neatly and have them within easy reach. Prepare your workspace by setting up the driftwood as the base and arranging the ropes for quick access during the knotting process.
Remember that each type of rope serves a different purpose in the creation of the wall hanging, so using them correctly is essential for achieving the desired outcome. With the proper materials in hand, you’re all set to begin crafting your boho macramé masterpiece.

Creative Co-Op Round Driftwood Wall Décor
Made with multiple sizes and shades of driftwood
As an affiliate, we earn on qualifying purchases.
As an affiliate, we earn on qualifying purchases.
Swing Seat Preparation Steps

To prepare the swing seat for your project, start by measuring the wood to 24 inches for the proper size. Cut the wood with a miter saw for precision and smooth edges.
Sand all edges of the wood to prevent splinters and guarantee a polished finish. Next, drill holes on each corner of the wood to attach the ropes securely. This step is essential for the stability and safety of your swing seat.
Once the wood is prepped, consider sealing or painting it with a protective coat to shield it from outdoor elements and enhance its appearance. A rich coffee-colored stain can add a touch of warmth to your swing seat, complementing the boho vibe of your macramé project.
Taking these steps won’t only ensure the durability of your swing seat but also elevate the overall aesthetic of your Tulum-inspired space.
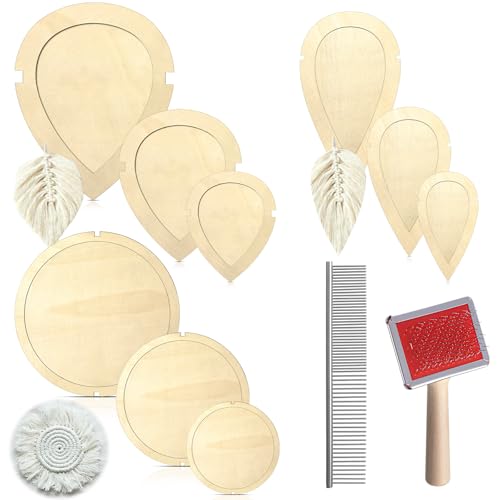
Teenyyou 11 Pcs Macrame Leaf Cutting Molds and Comb Sets Wood Macrame Leaf Cutting Template Fringe Stainless Steel Comb for Making Feather Tassel Wall Hangings Tool
Complete Macrame Set: the macrame supplies kit comes with 9 sets of wooden templates, two macrame combs, and…
As an affiliate, we earn on qualifying purchases.
As an affiliate, we earn on qualifying purchases.
Macramé Pieces Creation Process

Begin crafting your macramé pieces by measuring specific lengths of ropes based on your desired hanging height. Once you have your ropes cut to size, start wrapping them around the carabiners from the hanging kit.
Use these carabiners as the base for attaching the ropes and creating your macramé design. To create intricate patterns, employ a simple knotting technique, ensuring each knot is tight and secure.
Accuracy in measuring is essential to maintain consistency and aesthetic appeal across your macramé pieces. Follow a specific pattern and design to achieve a visually appealing macramé wall hanging that will add a touch of boho charm to any space.
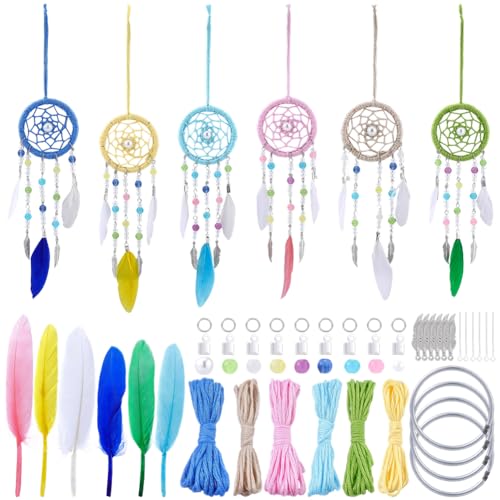
SUNNYCLUE DIY 6 Sets Dreamcatcher Kit Feather Dreamcatchers with Video Tutorials Wall Hanging Feathers Glass Beads Bohemian Ornament Making Kit for Car Mirror Home Decor Beginner Craft Handmade Gift
Video Tutorials: With clear and step-by-step video tutorials, there is no need to worry even without any manual…
As an affiliate, we earn on qualifying purchases.
As an affiliate, we earn on qualifying purchases.
Assembly and Hanging Instructions

You can easily assemble and hang your macramé wall hanging by attaching the pieces to a wooden dowel or driftwood for stability. Make certain to secure the knots tightly to guarantee the wall hanging is stable and secure. Once assembled, use a level to confirm the wall hanging is straight when it’s up on the wall. Consider adding decorative elements like beads or feathers to enhance the boho vibe of your piece. When you’re ready to hang your macramé wall hanging, use a nail or hook firmly attached to the wall for support.
To emphasize the importance of firmly hanging your macramé wall hanging, let’s take a look at the following table:
| Hanging Step | Details |
|---|---|
| Attach to Dowel or Driftwood | Ensure stability and structure |
| Secure Knots | Guarantee stability and durability |
| Level the Wall Hanging | Confirm straight alignment |
| Add Decorative Elements | Enhance the boho vibe |
| Hang Securely on Wall | Use nails or hooks for support |
Supplies and Materials for Wall Hanging

You’ll need different cord types like braided, three-ply, and single twist in neutral shades for your wall hanging.
Cost-saving tips are also available to help you stay within budget while creating your macrame piece.
These essentials will guide you through your project with ease.
Essential Cord Types
Exploring the essential cord types for your macramé wall hanging project will guide you in selecting the ideal supplies and materials to achieve the desired aesthetic. When choosing cords, make sure to contemplate the following:
- Braided Cords:
Opt for braided cords for added flexibility in your knotting techniques. These cords allow for intricate designs and patterns due to their pliable nature.
- Three-Ply Cords:
Three-ply cords are excellent for creating a twisted and defined look in your wall hanging. They provide structure and depth to your macramé piece.
- Single Twist Cords:
Single twist cords offer simplicity and elegance to your design. They’re perfect for achieving a clean and minimalist aesthetic in your wall hanging.
- Neutral Shades:
Stick to neutral shades when selecting cord types. These colors guarantee versatility and timelessness, allowing your macramé wall hanging to blend seamlessly with various décor styles.
Cost-Saving Tips
Consider incorporating cost-saving strategies when selecting supplies and materials for your macramé wall hanging project. To keep expenses in check, opt for three different types of neutral-shaded cord – Braided, Three-ply, and Single twist, all in 5mm thickness.
When cutting cords, use less for the sides and longer strands for the middle section to save on materials while maintaining a balanced look. Providing options for both cost-saving and standard cord lengths allows you to tailor the project to fit your budget.
For a simplified approach suitable for beginners, cut cords to varying lengths based on the section around the wall hanging. This method offers a straightforward way to achieve a visually appealing design without overspending.
Additionally, consider using a hot glue gun as a cost-saving measure for securing knots and adding finishing touches to your macramé creation. By implementing these tips, you can create a beautiful wall hanging while being mindful of your budget.
Knotting Techniques for Macramé

To achieve intricate macramé designs, mastering various knotting techniques is essential. Here are some key knotting techniques to help you elevate your macramé projects:
- Regular Lark’s Head Knots and Solomon Bars: Learn how to create these foundational knots to start your macramé journey with confidence.
- Triangular Shapes: Understand the specific knotting techniques needed to achieve stunning triangular shapes in your macramé creations.
- Square Knot Method and Gathering Knot: Discover how the square knot method can be used along with the gathering knot to add depth and color to your macramé designs.
- Solomon Bars with Multiple Square Knots: Master the art of completing Solomon bars with multiple square knots to create intricate and visually appealing macramé pieces.
Cost-Saving Strategies for Crafters

To save on costs while crafting your macramé wall hanging, consider using shorter cords for the sides and longer cords for the middle sections.
Varying the cord lengths in different sections of your project can help minimize waste and expenses.
Offering different cord length options caters to both budget-conscious crafters and those sticking to traditional methods.
Efficient Cord Usage
Maximize cost-efficiency in your macramé projects by strategically allocating cord lengths based on section requirements. To make the most of your materials and budget, consider the following tips:
- Focus on Shorter Cords: Use shorter cords for the sides of your wall hanging to reduce waste and save on materials.
- Opt for Longer Cords in the Middle: Choose longer cords for the middle sections of your project to maximize efficiency and minimize the number of cuts.
- Offer Variation in Cord Length Options: Provide different cord length options to cater to various budgets and allow crafters to select the most suitable option.
- Cut Cords to Varying Lengths: Tailor cord lengths to match the requirements of different sections of the wall hanging, ensuring you use just enough material for each part.
Sectional Cord Lengths
Consider utilizing varying cord lengths strategically to save on costs while creating your macramé wall hanging. By cutting cords to different lengths, you can effectively reduce material expenses without compromising the beauty of your craft. Beginners can benefit from this cost-saving strategy by opting for simpler approaches that involve different cord lengths. Detailed instructions typically offer both cost-saving and standard cord length options, giving crafters the flexibility to choose based on their budget and design preferences.
To illustrate how sectional cord lengths can help you save on costs, below is a table showcasing a possible breakdown for a macramé wall hanging design. By using shorter cords for the sides and longer cords for the middle section, you can achieve a visually appealing piece while being mindful of your expenses.
| Section | Cord Length | Quantity |
|---|---|---|
| Sides | Short | 8 |
| Middle | Long | 4 |
| Top Hanger | Medium | 1 |
Frequently Asked Questions
What Is the Meaning of Macrame Wall Hanging?
Macrame wall hanging is a decorative art form created by knotting cords in intricate patterns. It evolved from a practical textile technique into a popular craft for beautiful wall decor. Versatile in size and design, it adds bohemian or modern flair to spaces.
How Do You Pack Macrame?
When packing macrame, gently fold or roll it to prevent tangling. Use tissue paper or bubble wrap for protection. Place it in a sturdy box, secure with tape, and label as fragile for safe shipping.
Is Macrame Back in Style?
Yes, macrame is back in style! Its intricate knotting technique adds a unique touch to home decor. The trend’s versatility allows for customization, blending traditional craftsmanship with contemporary design. Embrace the boho vibe and create a cozy space!
How Do You Secure Macrame Wall Hanging?
To guarantee your macrame wall hanging, attach it to a wooden dowel, copper pipe, or driftwood. Maintain balance and use hooks, nails, or screws for wall mounting. Consider weight and size when selecting hanging hardware for proper security.
Conclusion
You’ve created a macramé wall hanging that’s so boho, it’ll make you feel like you’re sipping cocktails in Tulum!
With just a few simple materials and some creative knotting techniques, you’ve transformed your space into a cozy oasis.
So kick back, relax, and enjoy the laid-back vibes of your new DIY masterpiece.