
A DIY pegboard organizer is a smart way to make the most of your tiny apartment’s limited space. It transforms empty walls into practical storage, keeping your essentials visible and within reach. You can customize it to fit your wall dimensions, match your decor, and easily re-arrange hooks as your needs change. Installing is simple with basic tools, and it helps you stay organized while saving space. Keep going to discover how to create your own stylish and functional pegboard!
Key Takeaways
- Maximize vertical space by installing a custom-sized pegboard to organize small items efficiently.
- Use affordable materials and simple tools for easy, cost-effective DIY setup in limited spaces.
- Customize with hooks and accessories to suit different categories like kitchen utensils or craft supplies.
- Choose paint colors and designs that match your decor for a seamless, aesthetic look.
- Install in various rooms to create accessible storage solutions, reducing clutter in tiny apartments.

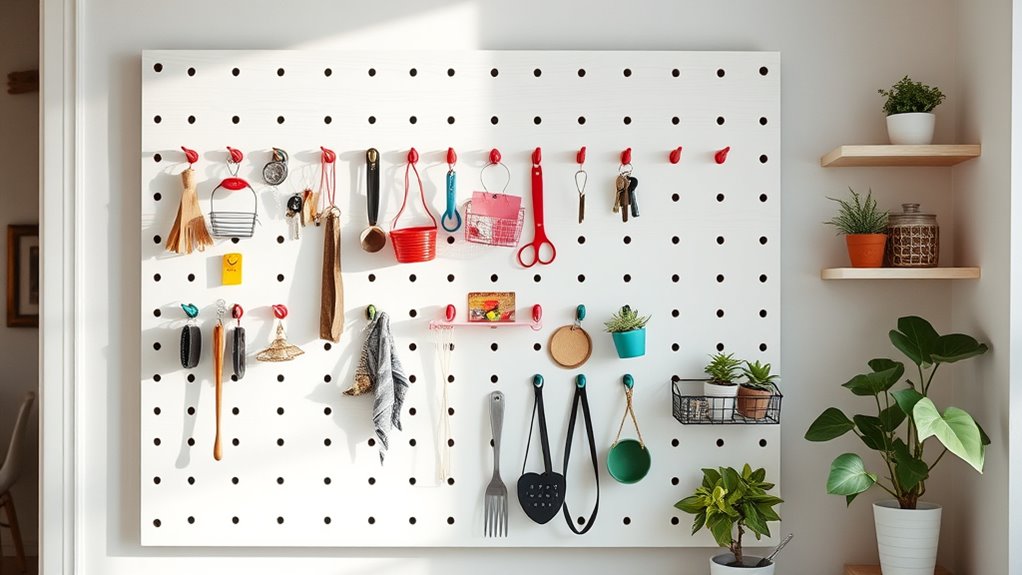
A DIY pegboard organizer is a simple and effective way to declutter your workspace or garage. When living in a tiny apartment, maximizing every square inch becomes a priority, and a pegboard is an excellent solution for creating space saving solutions. It transforms an empty wall into a practical storage area, freeing up valuable countertop or floor space. With wall mounted storage like a pegboard, you won’t have to worry about bulky shelves or cabinets taking up precious room. Instead, you utilize vertical space, which is often overlooked but incredibly valuable in small living environments.
Installing a pegboard is straightforward and customizable. You can choose a size that fits your wall and needs, and paint it to match your decor for a seamless look. Once mounted, you can hang tools, kitchen utensils, craft supplies, or even accessories, keeping everything within arm’s reach but out of the way. This approach not only creates an organized environment but also helps you find items faster, reducing clutter and stress. Because pegboards are versatile, you can easily rearrange hooks or add new ones as your needs change, making this a flexible storage solution that grows with you.
Choose a custom-sized, paint-matched pegboard to organize tools and accessories efficiently.
Using wall mounted storage like a pegboard also encourages better organization habits. You’ll quickly see what you have and what’s missing, which is especially beneficial in small spaces where clutter can quickly take over. The open design keeps your essentials visible and accessible, and because you can customize the layout, it’s easy to designate specific zones for different categories of items. Whether you’re hanging small tools, jewelry, or kitchen gadgets, a pegboard keeps everything tidy and easy to find. Plus, it’s a cost-effective option compared to buying additional furniture or storage units.
Another advantage is that a pegboard can be installed in any room—kitchen, bedroom, or even your entryway—making it a versatile addition to your apartment. It’s lightweight, easy to remove or relocate if needed, and requires minimal tools for installation. You don’t need to be a handyman to set it up; just a drill, some hooks, and a level are enough. As a space saving solution, it’s perfect for tiny apartments where every inch counts. It keeps clutter off countertops and floors, turning what might seem like limited space into a well-organized haven.
In short, a DIY pegboard organizer offers a practical, stylish, and affordable way to make the most of your small apartment’s limited space. It’s a smart wall mounted storage option that helps you stay organized and makes your living space feel larger and more functional. Additionally, understanding the importance of local resources and tools, such as regional hardware stores or online tutorials, can make installation and customization even easier.

Ultimate 121-Piece Pegboard Hooks Set, Pegboard Accessories with Metal Hooks, Durable Peg Board Organizer Accessories, Pegboard Bins, Peg Board Tool Utility Hooks
EFFICIENT ORGANIZATION – The pegboard set offers a practical solution for various home organization projects, keeping your tools…
As an affiliate, we earn on qualifying purchases.
As an affiliate, we earn on qualifying purchases.
Frequently Asked Questions
Can I Customize the Pegboard’S Color and Finish?
You can definitely customize the pegboard’s color and finish. With paint options like spray paint or acrylics, you can easily match your decor. Finish techniques such as sealing with clear varnish or matte spray can give it a unique look and added durability. You just need to choose the right paint and finish to suit your style, and you’ll have a personalized, functional organizer that complements your space perfectly.
What Tools Are Necessary for Installation?
You might think installing something simple requires just a few tools, but don’t underestimate what’s needed. To get started, you’ll need a drill with the right drill bits, wall anchors for stability, a measuring tape to ensure perfect placement, and paintbrushes if you want to customize your setup. These tools are essential for a secure, professional look, making sure your pegboard stays put and looks great.
How Much Weight Can a Pegboard Hold Safely?
You might wonder about the weight capacity of a pegboard, and it depends on its material strength. Typically, standard pegboards made from fiber or MDF can hold around 10-25 pounds safely per hook, while heavy-duty metal or reinforced boards can support more. Always check the manufacturer’s specifications and guarantee proper installation to avoid overloading, which could compromise the material’s integrity and safety.
Is It Suitable for Outdoor Use?
You might wonder if a pegboard is suitable for outdoor use. The key is weather resistance; if the pegboard is made from weather-resistant materials like treated wood or metal, it offers good outdoor durability. However, standard pegboards made from MDF or non-treated wood aren’t ideal outside, as they can warp or deteriorate quickly. Choose a weatherproof option for lasting outdoor performance and protection against the elements.
How Do I Prevent the Pegboard From Falling?
To prevent the pegboard from falling, you should focus on proper wall mounting and weight distribution. Use sturdy anchors and screws suited for your wall type, ensuring they hold the weight of your tools or accessories. Distribute the weight evenly across the pegboard by placing heavier items at the bottom and lighter ones at the top. Regularly check the mounting points for stability to keep your pegboard secure.

Daanxw Peg Board Kit, Includes Pegboard and Accessories,with Hooks and Bins,Peg Board Wall Organizer for Office,Ornaments Display,Crafts Organization (66, White)
METAL PEGBOARD: Our peg board panels are made of high quality steel with a powder coated finish that…
As an affiliate, we earn on qualifying purchases.
As an affiliate, we earn on qualifying purchases.
Conclusion
A DIY pegboard organizer is a game-changer, especially if you’re living in a tiny apartment. It maximizes your space and keeps everything within reach. Did you know that small cluttered spaces can boost stress levels by up to 30%? By creating your own organizer, you’re not just saving space—you’re creating a calmer, more organized environment. Start building today and enjoy a tidier, more functional home that fits your lifestyle perfectly.

ELEAD 4-Piece Flat Pegboard Hooks, Peg Board Organizer Accessories for Hanging, Fit 1/4" Pegboard, Peg Board Tool Hangers for Garage Kitchen Workbench
UNIVERSAL FIT – Designed to fit standard 1/4" pegboards with 1" spacing, these flat pegboard hooks require no…
As an affiliate, we earn on qualifying purchases.
As an affiliate, we earn on qualifying purchases.

Small Space DIY Storage Solutions: Apartment Storage Ideas DIY and Tiny Home Storage Hacks with Vertical Storage Ideas and Small Closet Organization … and Essential Skills for Everyday Makers)
As an affiliate, we earn on qualifying purchases.
As an affiliate, we earn on qualifying purchases.